This is the first of several trailers built and was built around 1999. This write-up was done when it was completed and since then a few other trailers have been made.
Many people have asked about this trailer and so to make it generally available we decided to show it off by the web. Every cook trailer out there is unique and we hope that our ideas relating to this one might help others in their quest for the perfect cook trailer.
First let me answer a couple of the most common questions we hear:
What did it cost you? About $2,000 in hard costs and many hours of my labor.
Would you sell it or would you make me one? It’s already been sold and No.
This cook trailer is a culmination of about 5 years of planning and four months of building. It was designed by Russ Durfee and Dave Gardner (with a lot of input from others) and built by Dave Gardner. Russ has cooked for large groups for some time and has a wealth of cooking gear. Some time ago we came to the conclusion that it would be much easier to have a gas cooking trailer than to load charcoal grills and deal with them at remote locations. We looked at a lot of existing trailers and we decided that we wanted an all-purpose trailer that could be used for almost any type of cooking. When Russ cooks it is seldom beans and cornbread. Normally its higher class foods that require a kitchen to prepare. In the summer of 2002 Russ retrieved a used fresh water tank from a trash dumpster. That was the piece that made us decide to begin construction.
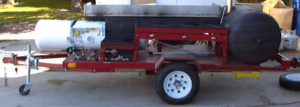
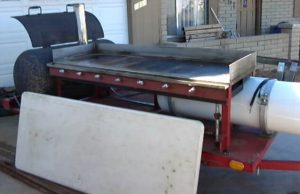
 Shown above is the right side view of the trailer. The base trailer was purchased in kit form from Harbor Freight Tools. We got a rain check from a sale and paid $300 for it. The regular price is $400 (at that time). It is their top of the line 4′ x 8′ plywood base trailer and includes leaf springs. We assembled it and used a sheet of 1/16″ plate steel instead of plywood (lower maintenance). One of our basic goals was to make a lightweight trailer that could be easily pulled by any vehicle. On this side we have four cooking burners which are shown in detail on the right.
Here you can see a close up of the burners on the right side. The first burner was made from a turkey cooker. This is a 175,000 BTU high output burner. If you look below it you can see the red knob which is a special high-output gas regulator just for this burner. When the burner is on it sounds like a jet engine. We wanted this to heat water quickly. Because we usually heat water in very large pots we lowered this burner so it’s easier to get big pots on and off of it.
Next to that we have two 70,000 BTU burners and then one 35,000 BTU burner. A friend gave me the bigger burners and the 35,000 BTU (same as a standard Camp Chef burner) was purchased from Harbor Freight for $15. The burner cover was constructed from 1″ x 1/4″ steel strap.
If you look down below the burners you will see Dave’s Universal Tool Mounts or UTM’s. These consist of a 1/2 piece of rod and a flat piece of bar with a hole in it just above the rods. 1/2″ conduit fits in these receptacles perfectly. We have put these UTM’s all around the trailer. You can see three of them in this picture. We also have four at the back of the trailer, two on the other side and two in the middle of the trailer. We have conduit poles that we can use to hold lanterns, cooking tools, serving trays (for taking stuff off the cooking surfaces or putting them on) and other things we’re still dreaming about such as canopies, etc.
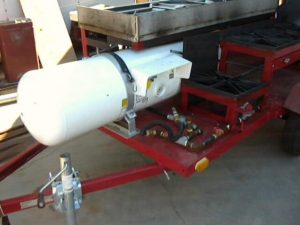 Here is the front right side of the trailer. You can see our main propane tank which holds 50 gallons of propane. It was purchased from a local RV dealer. It is 16″ in diameter and 5′ in length. It looks like a missile coming down the road. We also have a flex hose hookup for a standard 5 gallon tank. When cooking on a long-term camp it allows us to use and refill smaller tanks without having to bring the whole trailer to town for a refill. All of the piping is 3/4″ thick wall steel pipe. We probably could have used 1/2″ or 3/8″ and been fine.
As a side note we are building a large cutting board that will mount on top of the front of the trailer and extend all the way around from the edge of the turkey cooker burner to the grill. This will cover the propane tank and provide some good work surface for us.
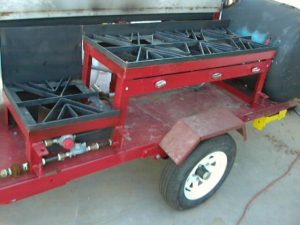
 The left side of the trailer has a 6′ x 2′ stainless steel griddle made from 3/16″ stainless steel. If I had to do it again I’d definitely use 1/4″ or even 3/8″ stainless to help in the heat distribution. I had this made by a professional welder because I have never welded stainless before and I wanted a good clean weld on the inside. Here you see it with a 6′ plastic table on it. The trailer normally has two of these tables on the grill. They fit perfectly and are always handy to have around.
 Here you can see the grill without the table on it. We have 5″ splash walls around the back and a grease channel the full length in the front.
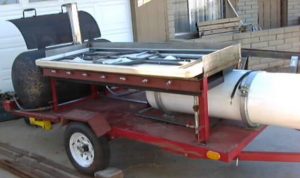
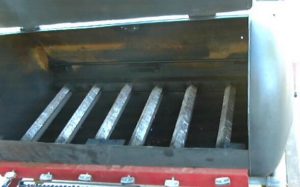
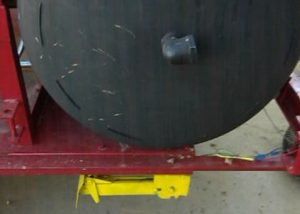
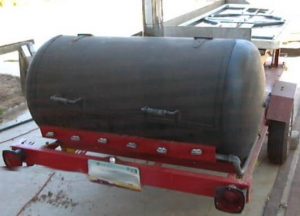 At the back of the trailer is the BBQ/Oven unit. It is made from a fresh water well tank which measures 26″ in diameter and is 56″ in length. We put two heat handles on it and had a smokestack donated by a local trucking company.
 Inside the BBQ/Oven we have a cooking surface that measures 25″ x 45″.
![]() All of the burners under the griddle and in the BBQ/Oven are 24″ cast commercial burners that we purchased from a restaurant equipment company. Each burner has three rows of holes and is rated at 22,000 BTU’s. Under the 6′ griddle we have 7 of these and in the BBQ/Oven we have 6.
All of the burners under the griddle and in the BBQ/Oven are 24″ cast commercial burners that we purchased from a restaurant equipment company. Each burner has three rows of holes and is rated at 22,000 BTU’s. Under the 6′ griddle we have 7 of these and in the BBQ/Oven we have 6.
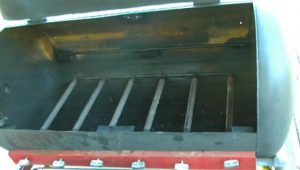 Here you can see inside the BBQ/Oven with everything removed except the burners. We purchased standard commercial gas valves and t-bar knobs which you can see on the front of the BBQ/Oven shown here. These valves come pre-jetted but they do require jetting adjustment once they are installed. We use these all around the trailer. The jetting was removed from the valves on the right side burners and replaced with copper tubing lines to the burners. The 24″ burners slide right onto the vale jets. There is also air vents on the end of the 24″ burners which must be adjusted before installation. In the BBQ the burners slide into the valve jets on the front side and then the rear 1/4″ pin on each burner locks into holes punched in a piece of 3/4″ angle iron mounted down the backside of the BBQ/Oven.
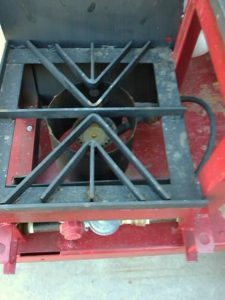
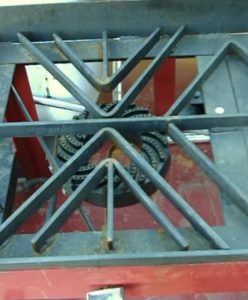
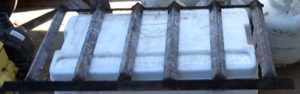 This is our heat dissipation unit for the BQ/Oven. It consist of 2″ x 1/8″ angle iron mounted on a rack with the point facing upwards. This entire unit sits on top of the burners and locks them down in the back. We also use this same method of dissipation under the griddle. We first tried it without and found out we needed something to help even the heat out. The ones under the griddle also have 1/4″ holes punched along the top of the angle iron to let some heat come directly up from the burner. With this configuration the griddle burners are seldom turned on more than 1/2 way.
 Here is a picture of the BBQ/Oven with the dissipation unit in place. Without this unit the heat from the burners would be centralized over each burner. With this unit the heat is even across the entire cooking surface.
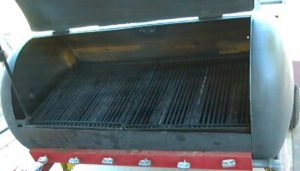
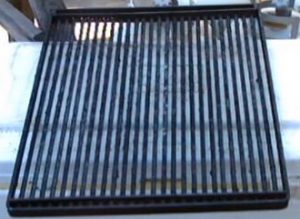 Here is picture of 1 of 2 grills for the BBQ/Oven unit. These are made from 3/8″ hot roll steel mounted within a 1″ x 1/4″ steel frame. The rods are free-floating so they can be rolled around for easy cleaning. Russ wanted to be able to really sear a steak on the BBQ. With these burners we are able to do that. Most of the cooking is done with the burners on 2/3 of the way. For great seared steaks we turn them on full. With this grill surface we can get about 30-40 good steaks or chicken breasts on it at one time. With six burners we can turn on half the unit and use the other half as an oven with the lid closed.
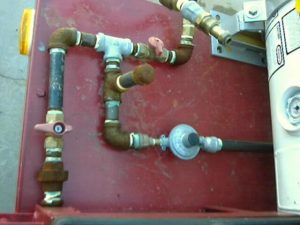
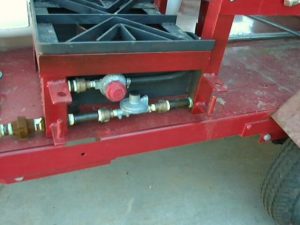 Here is another closeup of the turkey cooker regulator and stove top plumbing. We have three unions in the plumbing whch allow separate maintenance on the various components. We also have three gas regulators. One for the turkey cooker, one for the stove burners, and the other for the griddle and the BBQ/Oven.
 On the right side of the BBQ/Oven is an elbow that we hope to fit with a temperature gauge so we can see how the oven is doing. You can also see one of our two jack stands located at the back of the trailer. These help to stabilize it when it’s parked. You can also see that the BBQ/Oven is mounted right at the back of the 4′ x 8′ trailer. We extended out past the trailer end to create a bumper which protects the valves on the BBQ/Oven unit.
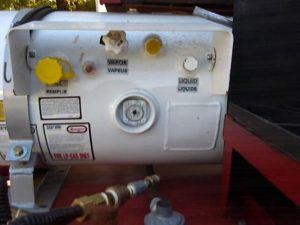 Here is closeup of the 50 gallon propane tank. This was originally meant to be used in a propane system for an RV engine. We had to swap the plug and valve from the openings marked “LIQUID” and the one marked “VAPOR”. Propane engine conversions run on liquid propane and our trailer needed vapor. This tank was ideal because it included a fill level gauge and a separate fill nozzle so we didn’t have to disconnect any of our fittings to refill it.
 Here is a view looking down at the turkey cooker. We had to use one piece of the original rubber hose from the cooker because it had a special fitting on it. You can also see the splash guard along the back of the burner which protect the propane tank.
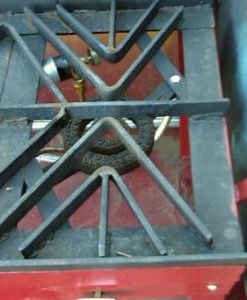
 Here is one of the two 70,000 BTU stove top burners.
 Here is the 35,000 BTU stove top burner.
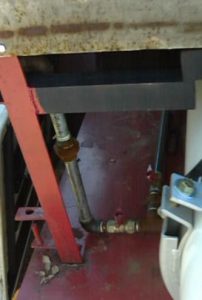
 Another view of some of the plumbing next to the turkey cooker. The stub with the rusted end cap will eventually be connected to the 50 gallon tank. You can see the end of the 5 gallon tank nozzle in the upper right corner of the picture. Just below it is a shutoff valve used when we are running off the large tank. The large tank has its own shutoff valve for when we are running off the smaller 5 gallon bottles. The other shutoff valve on the left side of the picture shuts off all the stove top burners. The union is after the shutoff valve so the stove top plumbing can be disconnected and worked on while the remainder of the trailer is operable.
 Here is the right side of the trailer just under the front of the griddle. You can see the shutoff valve for the griddle and another for the line to the BBQ/Oven. You can also see the union for the griddle as well as a Universal Tool Mount at the front of the griddle.
That’s about it. We still have more to do. We need to make a canvas cover and we’re fitting the stove top area to hold 4′ plastic tables during transport. We’re also considering building another trailer that would be for cleanup and pan storage. It would have a water heater and water pump, stainless sinks, work surfaces, etc. But that’s still in the dreaming stage.

Recent Comments