Convert a Natural Gas Orifice for use with Propane
05-2019 Update: Shout-out to Anderson & Forrester who took the time to write me with some great info! Take a look at their website at: www.andersonforrester.com. Specifically look at page 19 of their catalog for a kit to resize your orifices. Also they have a cool BTU cross calculator that is really useful.
 I have purchased a small stock of standard orifices with the smallest hole possible in them. When I’m building something I use these and drill the hole out to the size I want. I start small and work up to larger. If the hole get’s too big there is not turning back to make it smaller – or is there?
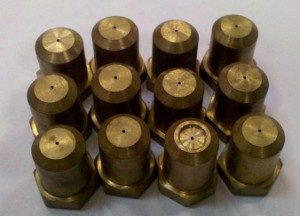
 I also have a larger box of used orifices that I have pulled from a wide variety of old used equipment over the years. The problem is that most of these were used for natural gas. Natural gas orifices have much larger jet holes in them than propane orifices. Since most of my work is with propane, these old natural gas orifices are mostly worthless – or are they?
So, I was rebuilding a smoker oven late one Friday night. I had a simple design that used orifices with a male thread on them which would screw directly into the manifold. It was a great design and I knew the orifices existed because I had a bunch of them. But the ones I had all had huge natural gas holes in them. I could go online and probably find them but I’d loose about a week waiting for them and it would cost me between four and ten dollars each. That’s when the thought occurred to me – maybe those natural gas orifices could be rebuilt with what I had laying around. That is where this write-up begins.
Now yes, I was able to pull it off and I’ll explain it here in detail. At the same time I am giving you my caveat:
This process is not something that you should do. It probably goes against everything a good gas guy learned at school. If done wrong it could be dangerous. I am publishing this for information only, not as a guide for others to do it. If you choose to take this information and do something – anything with it, you are on your own.
That being said, I am very pleased with my results and love it that I was able to finish my project that night and save a bunch of money in the process. Would I do it again? You bet I will. Now on to the instructions.
Step 1 – Drill Out the Orifices
All of the orifices I have are made of brass. In my shop I found some 3/32 inch brass brazing rod which I decided to use as a filler or plug. I then played around and found that a number 42 drill bit was just about the right size for the rod. So, I put the number 42 drill bit into my drill press and proceeded to drill each orifice with an even bigger hole than it had before. I then put a small countersink bit (or you could just use a larger drill bit), on the top of each orifice to create a bevel to the hole opening in the top.
Step 2 – Clean Up and Cut the Brazing Rod
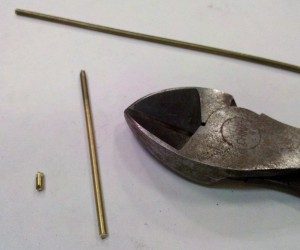
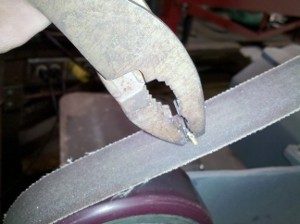 The brazing rod was a little oxidized so I cut a piece about two inches long, put it into my drill press. While it spun around I cleaned it with some 600 grit sandpaper I had. I then used a pair of wire cutters to cut about 1/4 inch pieces of the rod – one for each orifice I was fixing. I then used a pair of pliers to hold each piece of rod and touch it to a fine belt sander to flatten the end (get rid of the angled cutting marks).
Step 3 – Plug the Hole
Now I went over to my vise which has a small anvil on it. I put one of the little pieces of rod into the hole of one of the orifices. Make sure the flattened size is on the outside. Then standing the orifice up on end so the threads are face up and the orifice hole (now plugged) is facing down towards the anvil, I placed a flat punch down into the orifice from the top. The using a hammer I tapped and then with a little more force, smashed the little piece of rod into place. This works just like a brass rivet to create a solid plug. The two ends of the brass rod are pressed out like the head of a nail by the force. The rod also expands in the middle and completely seals the orifice on the top and inside.
Step 4 – Clean it Up and Re-Drill It
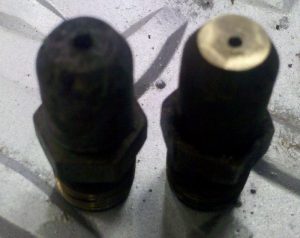 Once that was done I used my belt sander with a fine grit belt to clean up and flatten the end of the orifice. Then it was ready to re-drill with a smaller hole that I needed for LP gas. Below is a picture of one of the original orifices and one of the rebuilt and redrilled ones. Although the holes might look close, the newer (shiny) one is actually much smaller than the original. I had no problems drilling the new holes and the brass plug doesn’t look like its going anywhere. Now I’m ready to tackle my whole pile of used orifices and get them ready to be re-used. It takes me about 5-10 minutes each and it’s well worth the savings.

Recent Comments